I have the honour of hosting this month’s T-SQL Tuesday. In case there’s any doubt that’s for October 2023, I’m posting this invitation a little early as I got my dates clashed and I’ll be on holiday in Majorca next week!
For those of you who don’t know, T-SQL Tuesday is a monthly blog party where pople are invited to blog on a chosen subject related to SQL Server. You’re invited to join in whether you’re an experienced blogger, or have never blogged before. It’s a nice way to get started writing with a ready audience who’ll view your post.
Any of you who know me will know I have a keen interest in SQL Server Encryption and Data Protection so that’s the topic for this month’s blog party.
Any contributions relating to that topic are most welcome, and treat it as you see fit. Maybe you have a technical detail or discovery you want to share. Maybe you have a useful “how to”. Equally welcome are stories about encryption gone wrong – or incidents where data wasn’t protected sufficiently, and bad things happened. Or stories with a happy ending. It’s a deliberately wide topic, and I’d love a wide variety of contributions.
Whatever it is that comes to mind, I’d love your input and to hear your stories. I’ll review all the posts and aim to produce a roundup by the following Tuesday.
The usual rules apply:
Publish your post on Tuesday 10th October, or close enough that it can be vaguely jusified as happening on that date in a time zone somewhere.
Include the T-SQL Tuesday logo at the top of your post and link it back to this invitation. I should get a pingback so I know you’ve posted – but it’s worthwhile sharing me the link in the comments to this post too so I definitely don’t miss it.
If you’re on Twitter (I refuse to call it X), tweet your post using #tsql2sday
In a previous post we looked at executing queries against columns encrypted using Always Encrypted. In this short post we look at the ability to be able to have (or not) indexes on those columns. This information is relevant to the case where you are using Always Encrypted without enclaves, we’ll look at working with enclaves later on.
Where we want to query with a predicate, it is often useful to have an index on the column being searched. You can only have indexes on columns using deterministic encryption – not randomized. This makes sense as a column with randomized encryption is going to have different values stored even when the underlying plaintext value is the same, so an index would be meaningless. You also can’t perform comparisons on such columns so an index wouldn’t be useful. An index on a column deterministically encrypted with Always Encrypted will simply be an index of the encrypted values and as such is only useful for equality comparisons, not for sorting or range queries – though neither of these functions are possible against our deterministically encrypted column anyway.
To create an index on a column using deterministic encryption is the same as if the column is not encrypted. Here is an example using the database and table created in the previous posts Setting Up Always Encrypted and Executing Queries Using Always Encrypted. In our table dbo.EncryptedTable we have the columns LastName (which is encrypted using deterministic encryption), and FirstName (which is encrypted using randomized encryption):
CREATE NONCLUSTERED INDEX IX_LastName
ON dbo.EncryptedTable(LastName);
While we can’t index on our columns using randomized encryption, we can include them in the leaf pages of an index so that their values do not have to be retrieved using a Key Lookup operation. So the following SQL would also work:
CREATE NONCLUSTERED INDEX IX_LastName_Include_FirstName
ON dbo.EncryptedTable(LastName) INCLUDE(FirstName);
In common with any other index, a statistics object is created that maintains information about the distribution of data in the index. We can view the data held in the statistics object with the following command:
We only have a couple of rows in our table, but if you’re familiar with statistics objects, you’ll see this is pretty much the same as we would see where there is no encryption. What is interesting is to look at the last result set. Normally this would show actual data values in the RANGE_HI_KEY column; here we can see that we have an encrypted value. From this, we can understand that the statistics are based on the encrypted values. This underlines the point already made, that our index is an index of the encrypted values of our data. That makes sense as SQL Server is never aware of the unencrypted values, so it wouldn’t be possible for it to create or maintain indexes (or statistics) of the plaintext values.
This is different when using always encrypted with enclaves where indexes on columns with randomized encryption are allowed. In that case, those indexes, and associated statistics objects, are actually based on the plaintext values. As mentioned, we’ll talk about how that works in a later post.
This post is part of a comprehensive series on SQL Server Encryption. Subscribe to my blog for updates as new posts are published or you can buy my book through the link in the sidebar to get it all in one go.
And if you’re embarking on an encryption project (or anything else to do with SQL Server) and want some help, I’m available for consulting – please get in touch or check out my services page to find out what I can do for you.
In previous posts we’ve looked at a number of aspects of Always Encrypted and how it works. I think it’s very useful to understand how it actually works in practice, so in this post we’re going to look at what happens in the background when you execute a query.
To capture what happens in the background we’re going to run an XEvent Profiler trace so we can see what actually gets sent to the database. We start an XEvent Profiler trace from SSMS. You generally find it as the bottom item for your server in the Object Explorer. We’ll use the TSQL option, so right-click on that and select Launch Session:
What Happens with an Insert Query
Once the session has opened, we re-run our insert query from the last post and see what is captured. Here is the SQL:
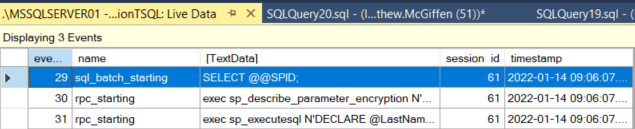
We can see there are two queries captured – normally we would just expect to see the one we executed. What we’re seeing here is what was described in What is Always Encrypted and how does it work? when we looked at the steps needed to execute a query over a connection with Always Encrypted enabled. Before executing the query itself, the client must issue a command to retrieve the encryption metadata. It needs to understand if any of the columns targeted by parameters are encrypted, and if so, it needs information about the keys. Let’s look at the query in full that is executed:
exec sp_describe_parameter_encryption N'DECLARE @LastName AS NVARCHAR (50) = @pacc87acf4618488b80bc61f6ac68114f;
DECLARE @FirstName AS NVARCHAR (50) = @p4113aa748f2e4ff585556f8eaa618f0d;
INSERT INTO dbo.EncryptedTable (LastName, FirstName)
VALUES (@LastName, @FirstName);
',N'@pacc87acf4618488b80bc61f6ac68114f nvarchar(50),@p4113aa748f2e4ff585556f8eaa618f0d nvarchar(50)'
Retrieving the encryption metadata is achieved by this call to the sp_describe_parameter_encryption stored procedure. SSMS has parameterized our query and then sent that text over to be parsed by the engine. We can execute the same query call to sp_describe_parameter_encryption ourselves and see what is returned. We get two result sets. There’s a fair amount of information returned so I’ll display them as tables rather than screenshots to make things more readable. The first result set gives us information about any Always Encrypted keys we will need to execute our query. In this case there is only one key involved in our query so we just get one row returned, but if there were multiple keys required, we would get a row for each.
There are a few key columns here:
column_encryption_key_ordinal is an assigned ordinal value used to identify the key and is useful when multiple keys are involved in the query.
column_encryption_key_encrypted_value is the encrypted value of the CEK as stored in the database.
column_master_key_store_provider_name tells the client where the CMK is stored.
column_master_key_path identifies the path to the actual certificate used as the CMK.
Armed with this information, the client driver can obtain the local copy of the CMK and use that to decrypt the encrypted CEK value to obtain the actual encryption key.
The second result set gives details of which parameters target encrypted columns:
Here we have two parameters as we are inserting a value into each of the two columns. The results are fairly clear, but let’s just go over a few of the values and what they mean:
parameter_ordinal is an ordinal value for the parameter.
parameter_name is the name of the parameter as supplied to the sp_describe_parameter_encryption stored procedure.
column_encryption_type describes whether encryption is deterministic or randomized. 1 means randomized and 2 means deterministic. You might also see the value of 0 which means plaintext where a parameter targets an unencrypted column.
column_encryption_key_ordinal denotes which key in the first result set (where there are more than one) should be used.
Armed with all this information and with the CEK now decrypted, the client driver can encrypt the parameters as required, and finally issue the query to SQL Server. This is the second query we saw in our XEvent Profiler capture:
exec sp_executesql N'DECLARE @LastName AS NVARCHAR (50) = @pacc87acf4618488b80bc61f6ac68114f;
DECLARE @FirstName AS NVARCHAR (50) = @p4113aa748f2e4ff585556f8eaa618f0d;
INSERT INTO dbo.EncryptedTable (LastName, FirstName)
VALUES (@LastName, @FirstName);
',N'@pacc87acf4618488b80bc61f6ac68114f nvarchar(50),@p4113aa748f2e4ff585556f8eaa618f0d nvarchar(50)',@pacc87acf4618488b80bc61f6ac68114f=0x01F82323F52B604A838ABC880ECDEB6CDD26ED47813F507A2EAA78FA1EE10FF47B2ED7C73C1A76580B6C0753A95DF5C944C5E590C2ED7E0AF59F1B4054317018584A9B8E3B4B0D9C4341B32DE2990E22C1,@p4113aa748f2e4ff585556f8eaa618f0d=0x012AC8899AACB8F1DDCEF4F6B2EB090F5E56687FDBB67D237E0E3D6D91C7F96C29F39396C633FB27DD92C7F2FABC18600D154FE1D426000CDB401ECD8BFD04AAC3
Here the parameterized version of our query has been issued to SQL Server with the plaintext parameters encrypted ready for insertion into the table. The long binary values at the end of the query represent the values “Matthew” and “McGiffen” encrypted using the correct CEK.
Before we move on to other queries, let’s pause and think about what this means for us in practice. The key thing to understand is that this call to sp_describe_parameter_encryption and the encryption of our parameters within the client driver is core to how Always Encrypted works. Plaintext values that target encrypted columns in the database must be sent via parameters. If your application only interacts through the database via parameterized queries – which is good practice – then you are in a good starting place in terms of implementing Always Encrypted. Otherwise, you are likely to have significant refactoring to do.
Another item worth discussing is the extra call that executing your query entails. It might seem this is going to add performance overhead. In reality the call is very lightweight with CPU consumption of less than a millisecond. On top of that, the results get cached locally so you don’t often see repeated calls to get the metadata for the same query. As a consequence of those two points, the performance overhead is generally negligible.
What Happens with a Select Query
Let’s repeat the exercise above and look at what happens when we execute our select query. We’ll start a new XE Profiler session and look at what is captured when we run the following select query:
SELECT *
FROM dbo.EncryptedTable;
Here we see the XE Profiler output:
In this case we’re not seeing the extra call to get the metadata which can seem slightly confusing. Surely the client driver needs that information to be able to decrypt the encrypt columns that are returned. The reality is that that metadata does get sent back, but it doesn’t need to be asked for. The fact that our connection has encryption enabled means that SQL Server knows it needs to supply that information back to the client, so it does so automatically. In the former case with an insert, we needed the metadata before we could issue the query which is what necessitated the extra call.
For the select query, the results are returned to the client encrypted, along with the metadata. The client driver then decrypts any columns if required to do so before passing the results back to the client application.
Summary
We can see it is a fairly simple mechanism that supports executing queries against encrypted columns. A combination of automated actions in the client driver with calls to sp_describe_parameter_encryption to retrieve encryption metadata – such as which columns are encrypted, the encrypted Column Encryption Key (CEK) and the location of the Column Master Key (CMK).
It’s not strictly necessary to understand this – but I think it really helps in making clear why there are restrictions in place on how you can interact with encrypted columns, as well as to understand why certain things you may want to attempt will or wll not work.
This post is part of a comprehensive series on SQL Server Encryption. Subscribe to my blog for updates as new posts are published or you can buy my book through the link in the sidebar to get it all in one go.
And if you’re embarking on an encryption project (or anything else to do with SQL Server) and want some help, I’m available for consulting – please get in touch or check out my services page to find out what I can do for you.
In this post we’ll look at how you interact with data that is encrypted using Always Encrypted. The examples here will show how you run queries from SSMS, in later posts we’ll look at stored procedures and application code – as well as what happens in the background when you execute a query.
For these examples we’re going to be using the database we created in the last post.
Performing a Basic Insert and Select
First we’ll look at how you should connect to a database when working with Always Encrypted. We’ll then look at the querying patterns you should use when working with encrypted columns.
Connecting to the Database
The first thing we need to do is to make sure we are using a connection to the database that has Always Encrypted enabled. You will want to be using a recent version of SSMS – at least version 18.
From SSMS you connect to the database engine as normal, and then in the Connect to Server dialog, you need to select the Options button. That then displays multiple tabs including one for Always Encrypted which we can see here:
You need to tick the Enable Always Encrypted box and then you can connect as normal. You will also notice the Enclave Attestation URL. We leave that blank for now, but we’ll use it when we look at Always Encrypted with Enclaves later.
Once you are connected, open a new query window. Right-click over the query window and select Query Options. Select the Advanced tab on the left – you should then see the GUI shown below. Right at the bottom of the available settings is Enable Parameterization for Always Encrypted; make sure this is ticked, and then click OK.
This setting tells SSMS that when you execute a query; the query should be converted to a parameterized query. Any variables used in the query will be converted to parameters. Those variables that target Always Encrypted columns will end up having their values encrypted before being sent to the database for execution.
If you forget to enable this, then when you attempt to issue a query on an encrypted connection, SSMS usually prompts to ask if you want to enable it.
Inserting Data
We’re now ready to try inserting some data. First, we’ll attempt something that will fail as it is an instructive example. Make sure your query window is set to the context of the TestAlwaysEncrypted database; then you can attempt to execute the following insert:
INSERT INTO dbo.EncryptedTable (LastName, FirstName)
VALUES ('McGiffen', 'Matthew');
You will find you get an error similar to this:
Msg 206, Level 16, State 2, Line 1
Operand type clash: varchar is incompatible with varchar(8000) encrypted with (encryption_type = 'DETERMINISTIC', encryption_algorithm_name = 'AEAD_AES_256_CBC_HMAC_SHA_256', column_encryption_key_name = 'TestCEK', column_encryption_key_database_name = 'TestAlwaysEncrypted') collation_name = 'Latin1_General_CI_AS'
What the error message is telling you, in perhaps not very plain language, is that you are attempting to insert an unencrypted value into an encrypted column. The plaintext values must be encrypted before you attempt to insert them.
In order to make that happen, we have to use parameters. Try the following instead:
Below is a screenshot of what should happen in your query window. You should see your variable declarations get a wavy blue underline. This denotes that the variable will be treated as a parameter. If you hover your mouse over one of the variables, you will see a pop-up message to that effect. SSMS will also parameterize your query before attempting to execute it. We’ll see what that means in the next post.
If you don’t see the wavy blue underline, then it is likely you haven’t enabled Parameterization for Always Encrypted. That will be confirmed if you execute the query and get the following error:
Encryption scheme mismatch for columns/variables '@LastName'. The encryption scheme for the columns/variables is (encryption_type = 'PLAINTEXT') and the expression near line '4' expects it to be DETERMINISTIC, or PLAINTEXT.
If all is configured correctly, when you execute the query, you will not receive an error and the row will be successfully inserted.
As a quick aside I want to show you something else that will fail as it demonstrates something that is important to understand. Let’s try a version of the insert query again with this SQL:
The only difference here is that I’ve been a little bit lazy about the size of my variables. I’ve set them to nvarchar(100) where the column in the table is nvarchar(50). Normally this wouldn’t be a problem as long as I didn’t actually supply values longer than the column can hold. In the case of Always Encrypted, however, we get an error similar to the following when we execute this.
Msg 206, Level 16, State 2, Line 11 Operand type clash: nvarchar(100) encrypted with (encryption_type ='DETERMINISTIC', encryption_algorithm_name = 'AEAD_AES_256_CBC_HMAC_SHA_256', column_encryption_key_name = 'TestCEK', column_encryption_key_database_name = 'TestAlwaysEncrypted') is incompatible with nvarchar(50) encrypted with (encryption_type = 'DETERMINISTIC', encryption_algorithm_name ='AEAD_AES_256_CBC_HMAC_SHA_256', column_encryption_key_name = 'TestCEK', column_encryption_key_database_name = 'TestAlwaysEncrypted') Msg 8180, Level 16, State 1, Procedure sp_describe_parameter_encryption, Line 1 [Batch Start Line 6]
When working with Always Encrypted and parameters, your parameters must be strongly typed, the type and size used must match what is in the table. Implicit conversions are not allowed. You also cannot insert a previously encrypted value into the table; that will fail with the same sort of error. That prevents someone from attempting to replace an encrypted value with one from another record.
Modifying data with an UPDATE statement works exactly the same way. You must use a parameter for a new value that you want to be stored in the table. One interesting point to note is that if you update multiple rows at once to the same value from a parameter, then the rows will end up with the same encrypted value even when randomized encryption is being used. This is because the parameter only gets encrypted using randomized encryption once.
Reading Data
We can check the outcome of our insert with a simple select query as follows:
SELECT *
FROM dbo.EncryptedTable;
Here are the results:
It’s logical at this stage to ask yourself how you know if the data actually got encrypted or not. As our connection has Always Encrypted enabled, the .NET library used by SSMS has automatically decrypted the results before sending them back to the application to be displayed. We can see the actual values stored in the database by opening a new query window and changing the connection. We keep the connection to the same server but go into the options and disable the “Enable Always Encrypted” option. Then we can execute the same select query again. This time we get results like these:
Here we see what is actually stored in the database and can see that our data has been encrypted.
Issuing a Query with a Predicate Against an Encrypted Column
So far we’ve just looked at a very simple select statement that returns all the results in the table. What if we want to search for a particular record? If we want to search based on the value in an unencrypted column – for instance, using the Id column our test table – this works exactly the same as if you didn’t have encryption. Decryption of the results happens automatically in the client driver, and functionality of our query is unaffected. What if we want to search for a particular value in an encrypted column – can we do that? The answer is that it depends; so let’s try it. First, let’s look at what is obviously not going to work. We’ll attempt to execute this SQL:
SELECT *
FROM dbo.EncryptedTable
WHERE LastName = 'McGiffen';
This fails with an error similar to the following:
Msg 206, Level 16, State 2, Line 1 Operand type clash: varchar is incompatible with varchar(8000) encrypted with (encryption_type = 'DETERMINISTIC', encryption_algorithm_name = 'AEAD_AES_256_CBC_HMAC_SHA_256', column_encryption_key_name = 'TestCEK', column_encryption_key_database_name = 'TestAlwaysEncrypted') collation_name = 'Latin1_General_CI_AS'
What the error is telling us is that we are trying to compare the value in an encrypted column with a plaintext value which is a nonsense thing to try. Rather than just returning us zero results as there is no match, SQL returns us an error to point out that we are not going about things in the right way. If you’ve been following so far, it’s not going to surprise you that we need to use a parameter – as is done in this SQL:
DECLARE @LastName nvarchar(50) = 'McGiffen';
SELECT *
FROM dbo.EncryptedTable
WHERE LastName = @Lastname;
This time we get some results:
The LastName column in our table is encrypted with deterministic encryption. The FirstName column however is encrypted using randomized encryption. Let’s see what happens if we try to use the following SQL to query against the FirstName column using the same pattern:
DECLARE @FirstName nvarchar(50) = 'Matthew';
SELECT *
FROM dbo.EncryptedTable
WHERE FirstName = @FirstName;
In this case we receive an error:
Msg 33277, Level 16, State 2, Line 11 Encryption scheme mismatch for columns/variables 'FirstName', '@FirstName'. The encryption scheme for the columns/variables is (encryption_type = 'RANDOMIZED', encryption_algorithm_name = 'AEAD_AES_256_CBC_HMAC_SHA_256', column_encryption_key_name = 'TestCEK', column_encryption_key_database_name = 'TestAlwaysEncrypted') and the expression near line '5' expects it to be'DETERMINISTIC, or RANDOMIZED, a BIN2 col'ation for string data types, and an enclave-enabled column encryption key, or PLAINTEXT. Msg 8180, Level 16, State 1, Procedure sp_describe_parameter_encryption, Line 1 [Batch Start Line 6] Statement(s) could not be prepared.
An error occurred while executing batch. Error message is: Internal error. Metadata for parameter '@pfe3eb6b759d54cdd8c38d6b5e8709633' in statement or procedure 'DECLARE @FirstName AS NVARCHAR (50) = @pfe3eb6b759d54cdd8c38d6b5e8709633;
SELECT *
FROM dbo.EncryptedTable
WHERE FirstName = @FirstName;
' is missing in resultset returned by sp_describe_parameter_encryption.
It’s a long error, but the short translation is that we are trying to compare data in a parameter with data in a column that is using randomized encryption, and that is not possible. The error messages you receive when attempting to query Always Encrypted data are not always very clear, so it helps to know the sort of things that are likely to go wrong. Combining that knowledge with the information returned in the error – in this case it states that the encryption for the column is randomized – will help you to quickly understand what the issue is.
Let’s look at another query pattern you might attempt. This SQL specifies my surname in capitals:
DECLARE @Lastname nvarchar(50) = 'MCGIFFEN';
SELECT *
FROM dbo.EncryptedTable
WHERE LastName = @Lastname;
GO
This is very similar to the first query that executed fine; however, in this case we get no results. Remember we saw that encrypted columns must use BIN2 collations which are case-sensitive. As my @LastName parameter doesn’t match the case of the values in the LastName column for the records in my table, SQL correctly returns no results. This can be problematic if you want to implement features like searching against encrypted columns where the search term may come from user input and users are used to not having to specify the correct case. There are ways you can work around that; I’ll mention one possibility – using a separate search catalog – in a later post.
Another pattern that will simply not work is the use of LIKE queries. The reason is that “Matthew” may be like “Matt” but the same cannot be said of their respective encrypted values. If we used a form of encryption where that was true, then it would end up being relatively weak and open to attack. If you attempt a LIKE query, you will simply get an error similar to the previous ones.
Summary
We can see that working with encrypted columns with Always Encrypted is reasonably straightforward, mainly we just have to understand what is possible and logical and what is not. It’s useful to be familiar with the sorts of errors you can see so you can quickly diagnose the problem when you have done something wrong.
This post is part of a comprehensive series on SQL Server Encryption. Subscribe to my blog for updates as new posts are published or you can buy my book through the link in the sidebar to get it all in one go.
And if you’re embarking on an encryption project (or anything else to do with SQL Server) and want some help, I’m available for consulting – please get in touch or check out my services page to find out what I can do for you.
In this post we’re going to go through the steps to set up Always Encrypted and create an encrypted column. As with my last post we’re looking at the flavour of Always Encrypted without enclaves, we’ll look at working with enclaves in detail later on.
It is a straightforward process to set up everything required for Always Encrypted. In fact, there is a wizard provided in SQL Server Management Studio (SSMS) that will do it all for you. In these examples, however, we will focus on performing the individual steps manually as that gives you a better view of what is going on. For all the objects involved we’ll look in detail at what is created so that you have a good level of understanding.
Before starting it is best to make sure that the version of SSMS you are using is up to date so that it has the full support for Always Encrypted. Anything above version 18 is fine.
Create Keys and Certificates
Before we start, we need a database we’re going to work in. We’ll call it TestAlwaysEncrypted – you can create it with the following SQL:
CREATE DATABASE TestAlwaysEncrypted;
Creating the Certificate and Column Master Key
First, we’ll create the Column Master Key (CMK). We have a few options for a CMK; in this post we’ll focus on the option of using a certificate stored on the local machine which contains an asymmetric key. You can also use an asymmetric key stored in an external key store such as Azure Key Vault; we’ll look at that option in a later post. When you create the CMK through SSMS, it also creates a CMK object in your database that identifies the location and identity of the actual key.
If you expand your database in the SSMS Object Explorer, you will find Always Encrypted Keys under the Security folder for the database. Right-click over Column Master Keys and select to create a new one, as shown in below:
This is the GUI that comes up:
At the top you can see I’ve given my new CMK the name TestCMK. In the box below we see a list of certificates in the selected key store available for use by Always Encrypted. I created the highlighted one simply by clicking the Generate Certificate button at the bottom. The Key Store for the certificate to be created in defaults to the Current User store. It is worth noting that when you generate a certificate, it is created on the local machine you are running SSMS on – not the SQL Server you are connected to – unless you are running SSMS on the server itself. Your account will need permissions to create certificates in the selected certificate store, or the generate certificate button will be grayed out – in that case you may have to run SSMS as an administrator to resolve the issue.
The decision of whether to create the certificate in the Local Machine or Current User store becomes more relevant once you are deploying the certificate to environments other than your local development environment. In those cases, I prefer to deploy to the Current User store for the account the application runs under – or if deploying to Local Machine, you can set the access for the certificate so only the application user account can access it. This minimizes the set of accounts that can access the certificate.
Click OK and the new CMK will be created. We can then see it listed under the Column Master Keys folder in SSMS, as shown here:
To understand what this key actually is, I’m going to right-click and generate the SQL definition. This also shows you the code if you want to create the SQL Server CMK object through T-SQL:
We only have two values, KEY_STORE_PROVIDER_NAME and KEY_PATH. All this is telling us is where to find the certificate we just created; KEY_PATH shows the path in the certificate store including the certificate’s thumbprint. If you are following along, your certificate will have its own unique thumbprint. You can see that the Column Master Key object stored in your database is just a pointer to the actual CMK, in this case a certificate stored on client machines.
If you want to create your certificate without using SSMS, you can do so with PowerShell. Here is an example:
In practice, when deploying your applications, you are likely to create the certificate ahead of time and deploy it as part of a deployment package. At a minimum you are also likely to want to use different certificates in your dev/test vs. production environments.
Creating the Column Encryption Key (CEK)
This is the last thing we need before we can set up encryption on our columns. The CEK is a symmetric key that will be used to encrypt our actual data and will be stored in the database encrypted by the CMK. You can find the Column Encryption Keys folder underneath Column Master Keys in SSMS which you saw earlier. Again, right-click to create a new key and bring up the GUI:
You can see I’ve called mine TestCEK, and in the dropdown, I’ve selected the CMK that I just created. Click OK and the CEK is created. We can see it in the object browser:
As with the CMK we’ll script the key out through SSMS so you can see what is created and the code involved:
We can see it tells us what CMK this is based on, what Algorithm has been used to encrypt the CEK, and a long binary Encrypted Value (which I’ve truncated here to make things more readable). The Encrypted Value is the actual key used to encrypt data, itself encrypted by the CMK. The Encrypted Value here is unique to my system. If you create your own CEK, you will have a different value.
The unencrypted value of the CEK never exists on the SQL Server, so both the CMK and CEK are required to interact with encrypted data. This is what makes Always Encrypted so secure – even if you have admin rights on the SQL instance, you don’t have access to the unencrypted value of the CEK, so you can’t read data unless you have access to the CMK too.
You can deploy a pre-created CEK using the preceding code, but you cannot generate a fresh CEK using T-SQL. part of the reason for that is that SQL Server cannot access the CMK which is required to encrypt the CEK. you have to use the GUI in SSMS, or if you wish to do it through code, then there are methods available with PpowerShell.
Create an Encrypted Column
We’re going to look here at how you define a column as encrypted when you create a new table. In later posts we will look at methods for encrypting existing data.
Always Encrypted can work with most types of data, but there are some restrictions on which data types you can encrypt – we’ll look at that later too. In general, you can encrypt both numbers and strings, but you are limited in the extra functionality you can have against encrypted columns, such as constraints, and you wouldn’t be able to encrypt columns with properties like IDENTITY. A specific restriction that it is good to be aware of is that string-based columns must use a BIN2 collation type. You’ll see what I mean by that when we create the table.
With Always Encrypted you can also use one of two types of encryption, randomized or deterministic. The difference is that with randomized encryption, where you encrypt the same value multiple times (where the value exists in multiple rows within your data), the encrypted values will all be different. With deterministic, the same unencrypted value will always end up with the same encrypted value. Randomized encryption is more secure and you should use it where you can, but it does limit your functionality. For instance, you can’t have an index on a column with randomized encryption; if you think about it, then that makes sense; if all the underlying values that are the same are stored as different values in the table, then how would it be possible to index them. If you want to index an encrypted column, then it must use deterministic encryption.
Another key restriction is that you cannot query with a WHERE clause against a column with randomized encryption. Let’s understand that. Say I have an encrypted text column using randomized encryption and want to find all rows that match a particular value. I have to try doing that by encrypting the value I am searching for and matching that against the encrypted values in the table, but because we are using randomized encryption, my encrypted search value will be different to all the encrypted values in the table even when the unencrypted value might be the same, so no match would be possible. In such scenarios SQL Server will return an error to tell you the operation is not allowed so you don’t attempt to execute queries where the result would be incorrect.
Deterministic encryption however is slightly less secure. Imagine that you are encrypting a text column which has a limited number of possible values; it may be possible to use frequency analysis to analyze the number of occurrences of each encrypted value and thereby match/guess what real value each corresponds to.
Let’s go ahead and create a table with two encrypted text columns. For the sake of example, we’ll use deterministic encryption for one and randomized for the other. The following SQL creates the table:
USE TestAlwaysEncrypted;
CREATE TABLE dbo.EncryptedTable(
Id INT IDENTITY(1,1) CONSTRAINT PK_EncryptedTable PRIMARY KEY CLUSTERED,
LastName nvarchar(50) COLLATE Latin1_General_BIN2 ENCRYPTED WITH (COLUMN_ENCRYPTION_KEY = TestCEK, ENCRYPTION_TYPE = DETERMINISTIC, ALGORITHM = 'AEAD_AES_256_CBC_HMAC_SHA_256') NULL,
FirstName nvarchar(50) COLLATE Latin1_General_BIN2 ENCRYPTED WITH (COLUMN_ENCRYPTION_KEY = TestCEK, ENCRYPTION_TYPE = RANDOMIZED, ALGORITHM = 'AEAD_AES_256_CBC_HMAC_SHA_256') NULL
);
We execute our SQL statement, and the table is created. You can see that what we are doing is specifying the details of encryption for each column we want to encrypt. We specify which CEK to use, which type of encryption (deterministic or randomized), and finally the algorithm used to encrypt the data in the column – though the algorithm specified is the only option at the current time.
Let’s just discuss the requirement for a BIN2 collation in more detail as you might be wondering why this is needed. A collation specifies the way data is compared and sorted. One feature of BIN2 is that it is a case-sensitive collation. That means, for instance, that if you search for a string like “Matthew,” it won’t match with “MATTHEW” or “matthew.” If you think about it, then it makes sense that you can’t have case-insensitive comparisons on an encrypted column. When you perform a comparison based on encrypted data, what the engine is doing is comparing one encrypted value with another. To enable a case-insensitive comparison there would have to be some deterministic pattern so that you can tell that two different encrypted values differ only by case. That would be more complicated to implement, would weaken the encryption, and isn’t supported by the encryption algorithm used by Always Encrypted. The requirement to use a BIN2 collation is driven by what will happen in practice when you compare two encrypted values looking for an exact match and also how such data is sorted. That creates some limitations on things like searching against encrypted columns – we’ll talk more about that later.
In terms of setup, that’s all you need to do, so you can see Always Encrypted is quite simple to implement.
Summary
Setting up Always Encrypted is straightforward. The key points to understand are:
You need a certificate and key pair which sit on the client machine or application server; this is the Column Master Key (CMK). Alternatively you can use an asymmetric key in an external key store.
In the database we have a CMK object, but this is just a pointer that tells us where the actual CMK can be found.
The Column Encryption Key (CEK) is stored in the database but is stored encrypted by the CMK. This key is what is used to encrypt or decrypt data.
To access data, you need access both to the CEK and the CMK.
This post is part of a comprehensive series on SQL Server Encryption. Subscribe to my blog for updates as new posts are published or you can buy my book through the link in the sidebar to get it all in one go.
And if you’re embarking on an encryption project (or anything else to do with SQL Server) and want some help, I’m available for consulting – please get in touch or check out my services page to find out what I can do for you.
Always Encrypted was a new encryption feature added to SQL Server with the 2016 version of the product. Initially it was just available in enterprise edition, but from SQL Server 2016, SP1 was made available in standard edition also.
Unlike TDE which encrypts the whole database, Always Encrypted is a form of column encryption that means you choose which columns of data you want to encrypt. The “Always” part of Always Encrypted refers to the fact that data is encrypted at rest, in memory, and as it is transmitted across the network. That means that it provides the highest level of protection possible for your data.
The beauty of Always Encrypted, and what makes it a great feature, is that you don’t necessarily need to make any code changes to use it. Neither your application side code nor your database side code – stored procedures/functions – needs to know which columns are encrypted or not. Encryption and decryption of data is carried out automatically for you. It does however come with limitations on how you can interact with data.
A key difference between Always Encrypted and existing forms of column encryption available in SQL Server is the encryption hierarchy used. Previous methods would rely on the encryption hierarchy within SQL Server. That would mean that a user with elevated permissions on the database server would be able to read encrypted data. Always Encrypted relies on a key stored in the database server as well as a certificate and associated asymmetric key pair that are only stored on the application server. That means you need elevated access on both servers to be able to read encrypted data.
A key concept with Always Encrypted is the idea of role separation. That refers to the idea that you should ensure there is a separation of roles between your system administrators. If different individuals (or teams) manage your application and database servers, and no individuals have admin rights on both, then no one can access encrypted data outside of the context it should be accessed. Even without role separation, the access requirements to read encrypted data make it much harder for an external attacker.
SQL Server 2016 vs. SQL Server 2019 and Beyond
In SQL Server 2019 new functionality was added to Always Encrypted that addressed many of the limitations in the previous version. To access the extra functionality however requires additional setup and management. I find it’s worth thinking about these as almost two separate versions of the same feature, and you may choose which to use depending on your requirements and circumstances. We can think of these as “Basic Always Encrypted” which is mainly what we got with SQL 2016 and “Always Encrypted with Enclaves” which was the main addition with SQL 2019.
The difference arises from the reason why we have limitations with Always Encrypted at all. A key thing to understand is the “Always” part. SQL Server never sees the unencrypted value of your data; encryption and decryption is actually carried out on the client side – on the application servers. As SQL Server is unaware of the unencrypted values of data, it is limited in the questions it can answer about your data.
With SQL 2019 the use of enclaves was added. An enclave is a secure partition within memory where protected operations can take place securely. Always Encrypted with Enclaves allows for decryption and encryption of data within a secure enclave on the SQL Server box which can therefore support a wider range of functionality.
In this post and the following ones, we’re going to first focus on basic Always Encrypted and then move onto the version with enclaves later on.
How Does Always Encrypted Work?
As mentioned, we’re going to focus on the basic version to begin with. The concepts around Always Encrypted are reasonably straightforward, but you’ll find yourself asking questions that seem tricky. Will Always Encrypted work if I try to do this or that? Why are you getting a particular error? I’ve blogged before about Always Encrypted and some of the specific questions readers ask me aren’t covered in the documentation; having a knowledge of how it all works generally enables me to answer those questions. If you understand the mechanics of encrypting and decrypting data, then any limitations make sense. As such, I’m going to spend quite a bit of time in this post explaining how it all works.
Encryption Hierarchy
SQL Server has a standard encryption hierarchy that we’ve seen when we looked at TDE and Backup Encryption. Always Encrypted doesn’t use that, mainly because the encryption activities don’t occur on the database server, as they are done on the client machine.
On the SQL Server side we have a Column Encryption Key (CEK) that is used to encrypt and decrypt data. That is stored encrypted in the database. The CEK is encrypted by the Column Master Key (CMK) which is actually a certificate and key pair that commonly sit on the client machine – usually an application server.
On SQL Server we do have a CMK object, but this is just a pointer to the location of the actual CMK.
You can have one CEK for all the encrypted columns in your database, or you could have one for each separate column – or something in between. The CMK can be shared by multiple CEKs so again you could have one or multiple CMKs.
Encryption in Practice
Let’s go through the process of how Always Encrypted works. The below image shows all the steps that occur when you issue a query.
At first glance it seems like a lot is going on, but we’ll go through each step in turn and you’ll see it is quite simple.
Issue Query The application will have created a connection to the database server. It has to specify that the connection will use Always Encrypted. Potentially, that is the only change you need to make to your application – if you’re lucky. It depends whether you end up needing to do work to get around the natural limitations of the technology – but we’ll get to that later. Once the connection is in place, then the application simply issues the query in the normal manner.
Request Encryption Metadata When issuing a query, any plaintext values that target encrypted columns must be passed as parameters and must be encrypted before being sent to the database. Where such a parameterized query is being executed, the client driver requests the relevant encryption metadata from SQL Server to understand what encryption activities must be carried out before the query is sent to be executed.
Return Encryption Metadata SQL Server parses the query text and identifies if there are any columns targeted by parameters that are the subject of column encryption using Always Encrypted. This information is sent back to the client, along with the encrypted values of any Column Encryption Keys (CEKs) used and in each case the location of the Column Master Key (CMK). This encryption metadata is cached locally on the client machine so that repeated calls to get the metadata do not need to be made for the same query.
Request CMK Using the details provided in the encryption metadata, the client driver makes calls to access the certificates and keys for the CMKs it requires. Usually these are stored in the certificate store on the application server. Where there are multiple application servers, then they need to be stored on each. You can also store your CMKs in an external store such as Azure Key Vault, we’ll cover that in a later post.
Return CMK The CMKs are received by the client driver.
Encrypt Parameters Any parameters that target encrypted columns need to be encrypted. The CEK that was returned by SQL Server for a given column is decrypted using the associated CMK; the parameter value can then be encrypted using the underlying key value. Only parameters will be encrypted, so if you have literal values in your query, then these will be a problem if they target encrypted columns. Update and insert queries must specify the values using parameters for them to function when targeting tables with Always Encrypted columns.
Issue Query The query with its parameters encrypted by the last step is sent to SQL Server to be executed.
Return Encrypted Results Where the query has results, such as with a select query, the results are returned. Where these include encrypted columns, then it is the encrypted values that get passed back. Encryption metadata is sent back alongside the result set which supplies the encrypted CEKs and CMK locations for any encrypted columns in the results.
Decrypt Data Where we have results containing encrypted columns, these are decrypted by the client driver before being returned to the application. This is done using the encryption metadata supplied alongside the results. As with the parameters, the CEK is decrypted using the associated CMK – sometimes this has already retrieved from the certificate store, and if not then there is an additional step to retrieve the CMKs. The unencrypted value of the CEK can then be used to decrypt the data in the column or columns that it is related to.
Return Results Finally, the results are returned to the application with values that were stored encrypted returned as the plain text version.
Summary
That can feel like a lot of steps to get to your data, but it all happens in the background and generally with little overhead. Each step is itself quite simple. It’s good to understand the overall flow so you can understand what will happen in different querying scenarios.
We’ll go over some of this again in a bit more detail when we have Always Encrypted set up and start looking at how you execute queries. Having seen the process though, we can now start to understand some of the key things about Always Encrypted:
Data only exists unencrypted after it hits the client.
SQL Server does not encrypt or decrypt data. That is all handled in the client driver. As such there is no way for SQL to know what the unencrypted values of your data are – it just sees an encrypted string.
This post is part of a comprehensive series on SQL Server Encryption. Subscribe to my blog for updates as new posts are published or you can buy my book through the link in the sidebar to get it all in one go.
And if you’re embarking on an encryption project (or anything else to do with SQL Server) and want some help, I’m available for consulting – please get in touch or check out my services page to find out what I can do for you.
In SQL Server you can also compress your encrypted backups. Unlike TDE this has been possible with Backup Encryption since the feature was first made available, and there have been no issues that have required fixing – though as always you should still test that restores work correctly. As mentioned in my post about compression with TDE, compressing backups has benefits not just in terms of file size but potentially also in reduced backup times as the time taken to write to disk is smaller.
Compressing an encrypted backup is the same as compressing a regular backup; you just need to specify WITH COMPRESSION as shown in the following SQL:
BACKUP DATABASE TestBackupEncryption
TO DISK = 'C:\Test\TestBackupEncryption_EncryptedAndCompressed.bak'
WITH ENCRYPTION(ALGORITHM = AES_256, SERVER CERTIFICATE = BackupEncryptionCert),
COMPRESSION;
We can run a quick test to see how compression performs against the same functionality with an unencrypted backup taken by executing this backup command:
BACKUP DATABASE TestBackupEncryption
TO DISK = 'C:\Test\TestBackupEncryption_UnencryptedAndCompressed.bak'
WITH COMPRESSION;
In this image we can see both backups:
Both backups are a fairly similar size. The encrypted one seems to be very slightly bigger, and I’d say this is the pattern I usually see, not enough that we are likely to be bothered with it. Compression is usually just as effective with encrypted backups as with unencrypted.
This post is part of a comprehensive series on SQL Server Encryption. Subscribe to my blog for updates as new posts are published or you can buy my book through the link in the sidebar to get it all in one go.
And if you’re embarking on an encryption project (or anything else to do with SQL Server) and want some help, I’m available for consulting – please get in touch or check out my services page to find out what I can do for you.
Unlike TDE, there is some extra CPU overhead when you take an encrypted backup as the data has to be encrypted before being written to disk – whereas with TDE the data is already encrypted. Backup times however are unlikely to be affected significantly as the bottleneck is usually going to be the time it takes to physically write the data to disk. The CPU processing should take a fraction of that time.
We can run a quick test with our database to show how backup performs with and without encryption. If you’re running this test yourself having followed the examples in Backup Encryption in SQL Server, then make sure the previous backup files are removed before executing the below script.
BACKUP DATABASE TestBackupEncryption
TO DISK = 'C:\Test\TestBackupEncryption_Unencrypted.bak';
BACKUP DATABASE TestBackupEncryption
TO DISK = 'C:\Test\TestBackupEncryption_Encrypted.bak'
WITH ENCRYPTION(ALGORITHM = AES_256, SERVER CERTIFICATE = BackupEncryptionCert);
Here is the output for the unencrypted backup:
Processed 1205416 pages for database 'TestBackupEncryption', file 'TestBackupEncryption' on file 1.
Processed 1 pages for database 'TestBackupEncryption', file 'TestBackupEncryption_log' on file 1.
BACKUP DATABASE successfully processed 1205417 pages in 17.428 seconds (540.355 MB/sec).
And here is the output for the encrypted backup:
Processed 1205416 pages for database 'TestBackupEncryption', file 'TestBackupEncryption' on file 1.
Processed 1 pages for database 'TestBackupEncryption', file 'TestBackupEncryption_log' on file 1.
BACKUP DATABASE successfully processed 1205417 pages in 19.631 seconds (479.716 MB/sec).
You can see the backup with encryption did take a bit longer, about 2 seconds, a little over a 10% increase which seems not too bad.
With backup performance, it’s also worth considering how long it takes to restore a database from a backup. Let’s take a quick look at that. We’ll drop the database, restore the unencrypted backup, then drop it again, and restore from the encrypted backup. Then we can compare the performance. We do all that with the following code:
DROP DATABASE TestBackupEncryption;
GO
RESTORE DATABASE TestBackupEncryption
FROM DISK = 'C:\Test\TestBackupEncryption_Unencrypted.bak';
DROP DATABASE TestBackupEncryption;
GO
RESTORE DATABASE TestBackupEncryption
FROM DISK = 'C:\Test\TestBackupEncryption_Encrypted.bak';
Here is the output for restoring from the unencrypted backup:
Processed 1205416 pages for database 'TestBackupEncryption', file 'TestBackupEncryption' on file 1.
Processed 1 pages for database 'TestBackupEncryption', file 'TestBackupEncryption_log' on file 1.
RESTORE DATABASE successfully processed 1205417 pages in 17.979 seconds (523.795 MB/sec).
And here is the output with the encrypted backup:
Processed 1205416 pages for database 'TestBackupEncryption', file 'TestBackupEncryption' on file 1.
Processed 1 pages for database 'TestBackupEncryption', file 'TestBackupEncryption_log' on file 1.
RESTORE DATABASE successfully processed 1205417 pages in 20.794 seconds (452.886 MB/sec).
You can see that like the backup itself, the restore from the encrypted backup took slightly longer – in this case about 3 seconds or 15%. It’s not too bad, but it’s good to be aware that you may see some impact.
This post is part of a comprehensive series on SQL Server Encryption. Subscribe to my blog for updates as new posts are published or you can buy my book through the link in the sidebar to get it all in one go.
And if you’re embarking on an encryption project (or anything else to do with SQL Server) and want some help, I’m available for consulting – please get in touch or check out my services page to find out what I can do for you.
We’ve seen in the previous posts that TDE is a simple way of protecting your at-rest data. There may however be times where you can’t or don’t want to use TDE. The main scenario for this is where you are on a version of SQL Server before 2019 (when TDE was made available in standard edition) and you don’t want to pay for the enterprise version which has a high price tag associated with it.
When we talk about protecting our at-rest data, the item that we are likely to be most concerned about is the security of our backups. Backups are generally – and should be – stored off the server itself, and often we will ship copies offsite to a third party where we don’t have control over who can access the data, even if we trust that that will be well managed.
From SQL Server 2014 the product has included the ability to encrypt data while creating a backup. This feature is available in both the standard and enterprise editions of SQL Server, so it is something you can use even when TDE may not be a feature that is available to you.
Backup Encryption has a lot in common with TDE in terms of the objects required. The encryption hierarchy is the same; you require a DMK and a certificate with a public/private key pair. In theory you can use an asymmetric key instead of a certificate, but this has the disadvantage that you can’t export the asymmetric key – which means you will struggle to restore your database backup to a different server. As such, for the sake of the examples that follow, we’ll just look at the certificate option.
You may however choose to use an asymmetric key if you wish to use Extensible Key Management (EKM) and store the key externally to your SQL Server. We’ll look at EKM in a later post.
Setting Up Backup Encryption
As mentioned, the prerequisites for Backup Encryption are the same as for TDE. We’ll go over creating them again here, but a little more briefly this time. Refer to Setting up TDE for more information.
Creating a Test Database
We’ll start with creating a sample database that we want to backup. You can skip this step if you just want to work with an existing database. We’ll use basically the same database we used for the TDE examples, just with a different name. The following SQL creates the database and populates it with test data:
CREATE DATABASE TestBackupEncryption;
GO
USE TestBackupEncryption;
CREATE TABLE dbo.SomeData(Id INT IDENTITY(1,1), SomeText VARCHAR(255));
GO
INSERT INTO dbo.SomeData (SomeText)
SELECT TOP 1000000
('XXXXXXXXXXXXXXXXXXXXXXXXXXXXXXXXXXXXXXXXXXXXXXXXXXXXXXXXXXXXXXXXXXXXXXX')
FROM sys.objects a
CROSS JOIN sys.objects b
CROSS JOIN sys.objects c
CROSS JOIN sys.objects d;
GO 100
Create the Database Master Key (DMK)
You must have a DMK, which resides in the master database, and you can create it with the following code:
USE master;
CREATE MASTER KEY
ENCRYPTION BY PASSWORD = 'UseAStrongPasswordHere!£$7';
You should also backup the DMK using the following command:
BACKUP MASTER KEY TO FILE = 'C:\Test\MyDMK'
ENCRYPTION BY PASSWORD = 'UseAnotherStrongPasswordHere!£$7';
Creating the Certificate
You also require a certificate in the master database which has an associated public/private key pair. Unlike TDE, in the case of Backup Encryption, this key pair will be used to directly encrypt the backup using asymmetric encryption. There is no separate Database Encryption Key required. You create the certificate with this SQL:
USE master;
CREATE CERTIFICATE BackupEncryptionCert
WITH SUBJECT = 'Certificate used for backup encryption';
You should take backups of the certificate and private key and keep them safe if you ever want to be able to restore your backups to another server. Here is the SQL to backup these objects:
BACKUP CERTIFICATE BackupEncryptionCert
TO FILE = 'C:\Test\BackupEncryptionCert.cer'
WITH PRIVATE KEY
(
FILE = 'C:\Test\BackupEncryptionCert_PrivateKeyFile.pvk',
ENCRYPTION BY PASSWORD = 'UseAStrongPasswordHereToo!£$7'
);
Permissions
It’s possible that the account you generally use for taking backups doesn’t have sysadmin permissions on the server. If that is the case, then there are some additional permissions required. The account needs the db_backupoperator role in each database being backed up, but that should already be in place. The only additional permission required is that the account must have the VIEW DEFINITION permission on the certificate. You can assign that permission with this SQL:
USE master;
GRANT VIEW DEFINITION ON CERTIFICATE::BackupEncryptionCert
TO [MyBackupAccount];
That’s all we need to do before we are ready to start encrypting our backups.
Working with Encrypted Backups
Now that we have all the objects in place to encrypt our backups, we can look at how you take a backup with encryption enabled and how you restore an encrypted backup.
Taking an Encrypted Backup
It is possible to encrypt any of the backup types – FULL, DIFFERENTIAL, or LOG. In practice if you are using Backup Encryption, you are likely to want to make sure all are encrypted. The syntax is the same in each case though, so we’ll just look at FULL backups. This is the backup command with encryption specified:
BACKUP DATABASE TestBackupEncryption
TO DISK = 'C:\Test\TestBackupEncryption_Encrypted.bak'
WITH ENCRYPTION(ALGORITHM = AES_256, SERVER CERTIFICATE = BackupEncryptionCert);
You can see we specify the algorithm. As with TDE, AES_256 is recommended (Advanced Encryption Standard with a 256-bit key). We also specify which certificate to use.
We can view data about the backup using the RESTORE HEADERONLY command, which will include information about encryption. Here is the code for that:
RESTORE HEADERONLY
FROM DISK = 'C:\Test\TestBackupEncryption_Encrypted.bak';
This returns us a lot of information, so I won’t include the full set of columns. Relevant to encryption though, we will see the following:
You can use this if you need to be able to check whether a particular backup is encrypted or not.
Restoring an Encrypted Backup
Restoring an encrypted backup is the same as restoring any other backup – as long as the certificate used to encrypt the backup exists on the server.
If you are restoring to a different server, you will need to restore a copy of the certificate and private key from the backup taken before you can restore the encrypted database (the server must also have a DMK before you can do this). This is the same command we covered in Migrating or Recovering a TDE Protected Database:
USE master;
CREATE CERTIFICATE BackupEncryptionCert
FROM FILE = 'C:\Test\BackupEncryptionCert.cer'
WITH PRIVATE KEY
(
FILE = 'C:\Test\BackupEncryptionCert_PrivateKeyFile.pvk',
DECRYPTION BY PASSWORD = 'UseAStrongPasswordHereToo!£$7'
);
Then you can simply restore the database as normal with the following command:
RESTORE DATABASE TestBackupEncryption
FROM DISK = 'C:\Test\TestBackupEncryption_Encrypted.bak';
If you get an error, it is likely to be because the certificate doesn’t exist – for instance, if you have restored the wrong one:
Msg 33111, Level 16, State 3, Line 25 Cannot find server certificate with thumbprint '0xA2E4A2A29182054B2F97FCD9954FA9349B4351EC'. Msg 3013, Level 16, State 1, Line 25
RESTORE DATABASE is terminating abnormally.
This post is part of a comprehensive series on SQL Server Encryption. Subscribe to my blog for updates as new posts are published or you can buy my book through the link in the sidebar to get it all in one go.
And if you’re embarking on an encryption project (or anything else to do with SQL Server) and want some help, I’m available for consulting – please get in touch or check out my services page to find out what I can do for you.
Database backups continue to work without change when you have TDE enabled. The only difference is that the backups contain encrypted data that cannot be read without the certificate and private key. There are a couple of points that are worth discussing though.
Backup Performance
Following on from general questions of TDE performance, it’s sensible that you might also be concerned whether TDE has an impact on backup times. You may also have read of people complaining about long backup times with TDE.
It’s not necessarily true that TDE has much of an impact on backup performance. The reason is that when a backup is performed, SQL Server does not have to encrypt the data. The data already sits encrypted on disk in the data and log files, and those copies of the data are what are used for performing the backup. In practice there may be some data in memory that has yet to be encrypted and written to disk, but in general, that is not going to be large enough to cause significant overhead.
When people talk about issues with backup performance and TDE, they are likely to be talking about the case involving backup compression.
Backup Compression
Many people use backup compression with database backups in SQL Server. It is simple functionality to use as shown in this code example:
BACKUP DATABASE [TestTDE] TO DISK = 'C:\Test\TestTDE_Compressed.bak' WITH COMPRESSION;
The benefit of backup compression isn’t just about having smaller backup files but also in the time taken to perform a backup. The biggest bottleneck involved in taking a backup is usually the time it takes to write it to disk. By taking compressed backups you can significantly reduce backup takes. This comes at the cost of some extra CPU overhead to perform the compression, but unless your CPU is under pressure, it’s often worthwhile.
Up until the 2016 version, SQL Server did not support backup compression on TDE enabled databases. One reason for this may be that most compression algorithms work best where there is some repetition in the data to be compressed, but encrypted data looks pretty much random. What this meant in practice was that you might specify the WITH COMPRESSION option when backing up your TDE-protected databases but you wouldn’t see much difference in the file size or backup times. This changed from SQL 2016 and was a welcome improvement.
To use backup compression with TDE, however, you needed to specify an additional parameter MAXTRANSFERSIZE. This parameter specifies the largest unit of transfer in bytes used between SQL Server and the backup media. If you’re interested in fine-tuning your backup performance, this is one value you can play with. Backup compression with TDE doesn’t kick in unless your MAXTRANSFERSIZE is greater than 64kb (65536). As long as the value you specify is at least one greater than 64k, then an optimized algorithm for compression of TDE encrypted databases is enabled. Commonly people use the value of 128kb. The command looks like this:
BACKUP DATABASE TestTDE TO DISK = 'C:\Test\TestTDE_Compressed.bak'
WITH COMPRESSION, MAXTRANSFERSIZE = 131072;
This extra parameter becomes unnecessary if you are on SQL Server 2019 Cumulative Update 5 or higher. With that release, if you specify WITH COMPRESSION for a backup taken for a TDE-protected database and you don’t specify MAXTRANSFERSIZE, then MAXTRANSFERSIZE will automatically be increased to 128kb, and your backup will be compressed.
Backup Compression Issues
The introduction of backup compression for TDE-protected databases has however not been without problems, and this is something you really need to be aware of. There have been a number of bugs discovered where a compressed backup of a TDE database was found to be unrecoverable. Some people have also reported that restore times were massively increased in some cases.
If you’re on a version of SQL Server higher than 2016 CU 7 or 2016 SP1 CU4, then you should be fine, but I would stress the importance of regularly testing your backups by restoring them. A few days before writing this, I came across the term Schrodinger’s Backup – the condition of any backup is unknown until a restore is attempted. When it comes to TDE and backup compression, you should consider that as a very true statement.
TDE and High Availability
In general, TDE plays nicely with any of the built-in features that SQL Server has for high availability (HA). That includes:
Availability Groups
Log Shipping
Database Mirroring
In theory, in all cases, the actions you need to take to support TDE are the same. You just need to ensure that the secondary server has a Database Master Key (DMK). Then you need to ensure that copies of your certificate and private key have been restored to the secondary before you turn encryption on. This is the same step you would take if you were attempting to restore a TDE-protected database to a different server. We covered that a previous post Migrating or Recovering a TDE Protected Database.
As long as that is done, then whichever HA tool you use should take care of the rest.
In practice, we DBAs are cautious folk, and you don’t want to risk anything going wrong when you are dealing with a live system. As such you may want to take the following steps:
Remove the database from HA.
Set up TDE for the database and turn on.
Set up the keys and certificate on the secondary.
Add the database back into HA.
This post is part of a comprehensive series on SQL Server Encryption. Subscribe to my blog for updates as new posts are published or you can buy my book through the link in the sidebar to get it all in one go.
And if you’re embarking on an encryption project (or anything else to do with SQL Server) and want some help, I’m available for consulting – please get in touch or check out my services page to find out what I can do for you.